Anyone who deals with the mystery machine (computer) knows that performance is always a problem. Performance problems tend to occur after using the computer for a while. The last performance problem, I had to deal with was for a friend whose computer suddenly went slow and kept displaying the message “Your system is low on virtual memory”. If you are one of those with a slow computer or just thinking of how to improve or optimise your computer’s performance, then here is the way to do it. The steps described here will also take care of the message above and enhance your computer’s performance.
What is a Virtual Memory (or Page File)?
Virtual memory or page file is an extension of the computer's physical memory (RAM*). The moment our total RAM or physical memory is used up, Windows automatically takes a small amount of hard drive space and uses it like a real memory. This frees up space in the RAM to load a new application. This enables us to run multiple programs at once.
Virtual memory is much slower than physical memory or RAM. When you don't have enough RAM, the operating system has to constantly swap information back and forth between RAM and the hard disk. This is called thrashing, and it can make your computer feel frustratingly slow.
By default, Windows automatically creates virtual memory or page file during installation. The size of the page file created is based on the amount of physical memory present at the time of installation. For example, Windows XP creates a virtual memory 1.5 times the size of RAM in the computer.
*RAM = Random Access Memory
Setting up Virtual Memory
Now, here is how to optimize your page files or virtual memory. Your main objective here is to improve system performance and also to avoid getting the message “Your system is low on virtual memory”.
1. Click Start, then open the Control Panel
2.Double click the System applet to open “System Properties”
3. Click the Advanced tab and then click Settings in the “Performance” section
4. Click the Advanced tab
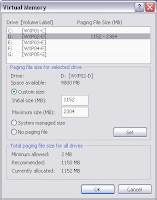
5. Then click Change under the 'Virtual Memory' section. Here you can select any drive partition and set either ‘Custom’; ‘System Managed’ or ‘No page file’.
6. Finally, click Set before going on to the next partition. (always remember to click Set for changes to take effect)

If you choose ‘Custom’, I recommend you do the following:
For Initial size (MB): Input at least 1.5 times the size of your current RAM
For Maximum size (MB): Input at least 2.5 to 3 times the size of your current RAM.
Do not go lower than the size of physical memory and if you are not very sure of what to do always choose “System managed size” and never under any circumstance select “No paging file”. Also, remember that virtual memory is measured in megabytes (1024 MB is equal to 1GB).
Finally, note that there are other ways of getting to the virtual memory section and the steps above is just one of them. To do this in Vista watch out for "How To Adjust Virtual Memory In Windows Vista" on this blog.
Thank you for reading and remember to leave your comments and subscribe.
By: Elliot Senya

1 comment:
this has given me a great understanding about networking. can better explain simple computer issues now.
Post a Comment